


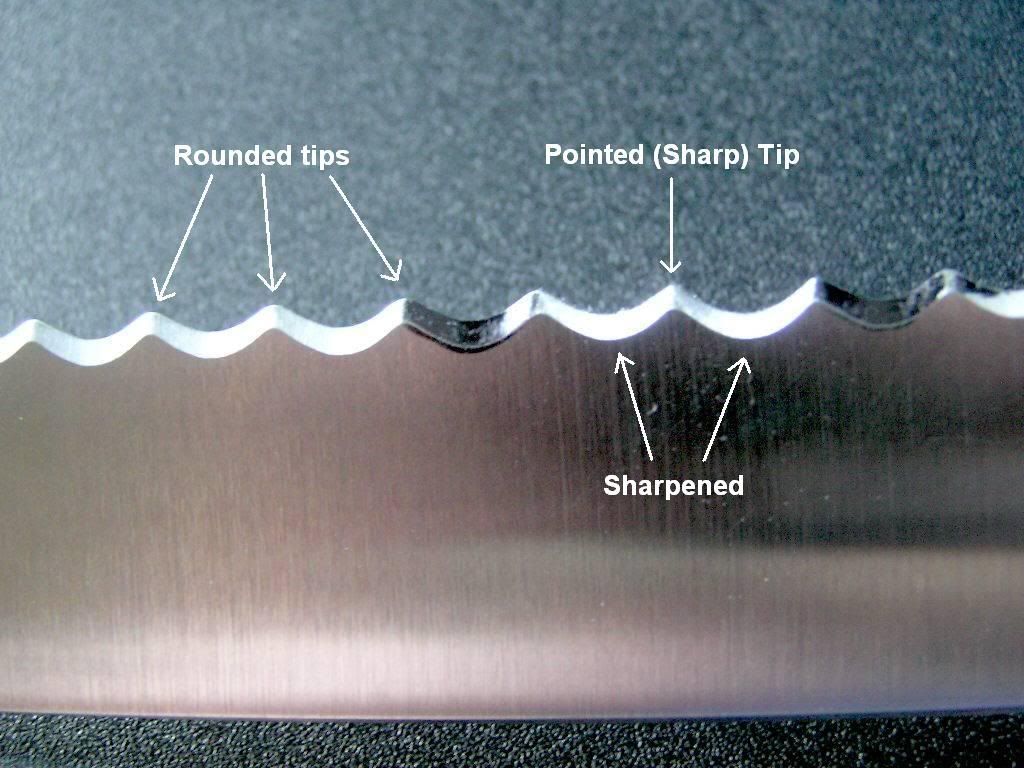
OK, even though most of you would never admit to it I know that you've got a serrated knife or two hanging around the house. I'm also quite sure that these knives are likely dull (or duller than they were when new) and could use a little edge refreshing. Chances are that the points are starting to round and the edges are dull or even bent over to the reverse side. Well, if you have a knife like this, it's your lucky day.

Does this look familiar?
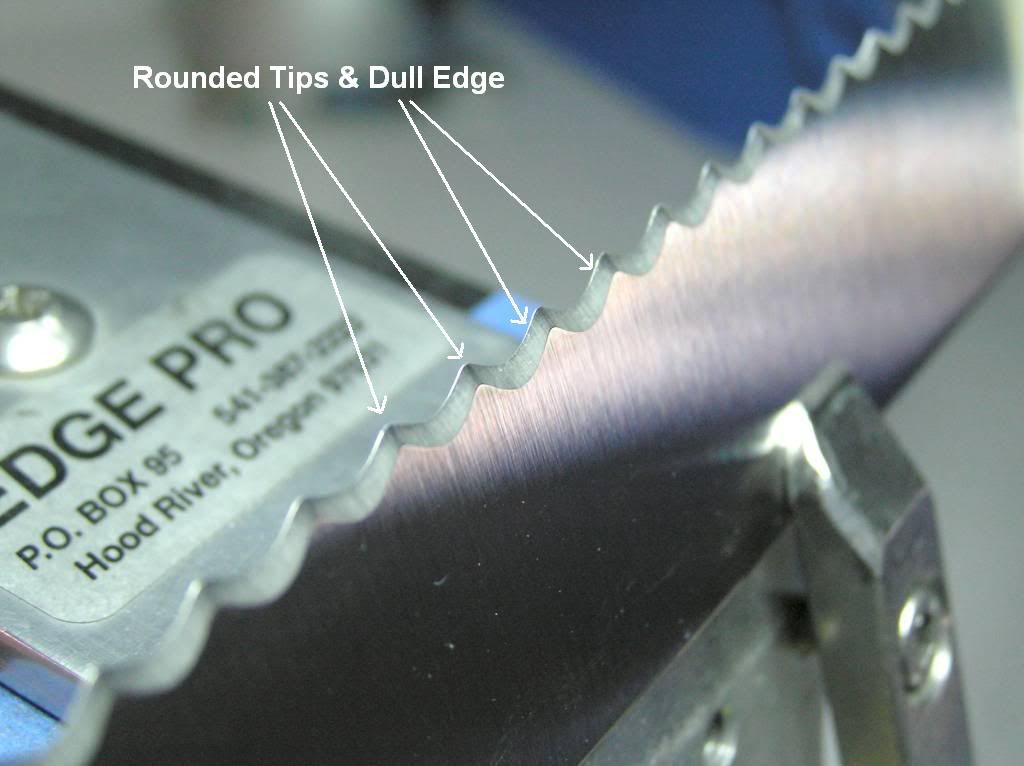
Full size image: »http://img.photobucket.com/albums/v...«
I've been asked a lot about how to sharpen serrated knives so I thought I'd throw together a little information on how someone can easily do so at home with items easily found at their local Home Depot.
The tools of choice are an assortment of wooden dowels and cloth backed sandpaper. Simple enough? I hope so.

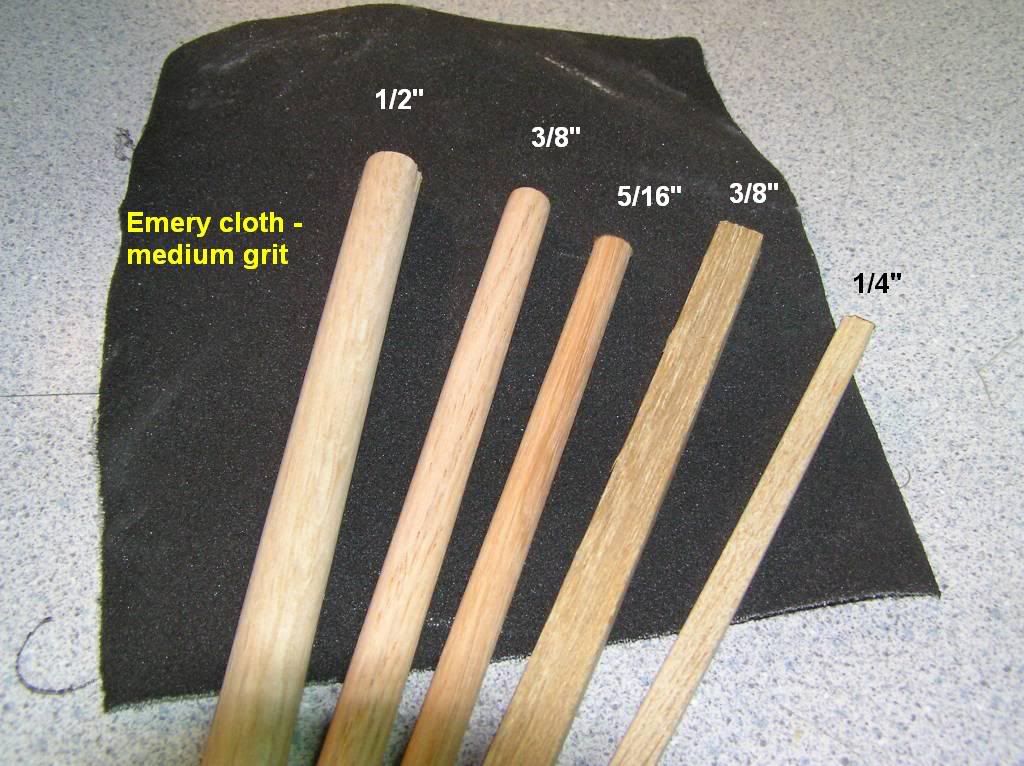
Full size image: »http://img.photobucket.com/albums/v...«
I prefer cloth backed sandpaper because it's less likely to tear if caught slightly off angle. I like to use "medium" grit as it cuts fast, but if you want a finer finish, you could use "fine" grit instead.
I purchased 36" lengths of all the dowels shown as well as a package of medium grit emery cloth for less than $10 at Home Depot. I think it was actually less than eight but I lost the reciept so there.
The round dowels are used for round serrations and the square dowels are used for v-shaped serrations.
You will want to start off by mounting the knife in a vise. If you don't have a vise don't worry as you can do this while holding the knife in one hand. It's just easier to do with the use of a vise.
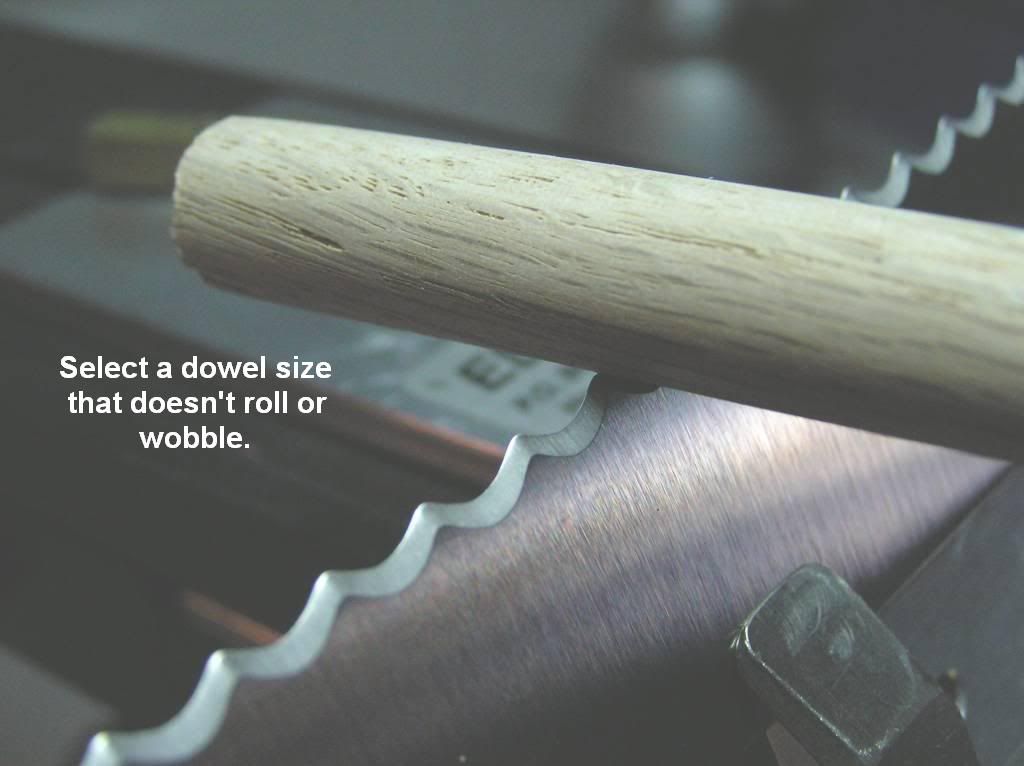
Then select the appropriate sized wooden dowel to use. The right size dowel will fit into the gulley of the serration, will touch the edge bevel, and will not rock or wobble side to side. The 1/2" dowel is the one that is most commonly used for sharpening the serrations on Wusthoff and similar level knives.
Full size image: »http://img.photobucket.com/albums/v...«
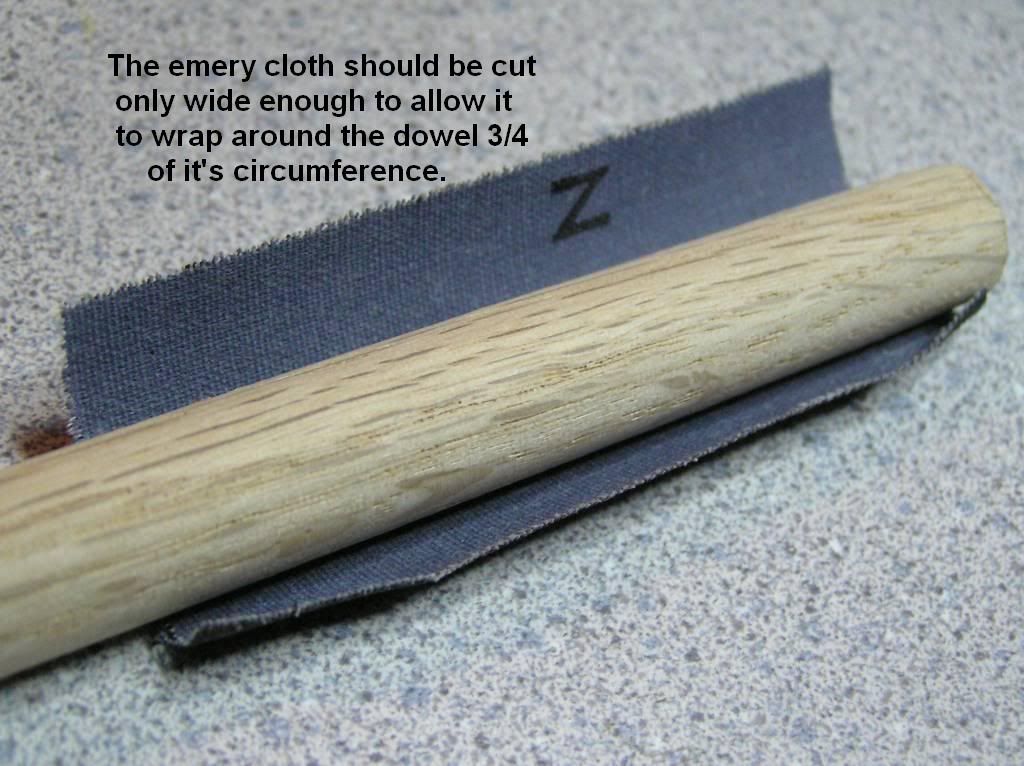
Wrap a strip of emery cloth around the pre-selected dowel so that it only wraps around 3/4 of the dowel's circumference.
Full size image: »http://img.photobucket.com/albums/v...«
The sandpaper will be held in place by finger pressure. It should look like this...
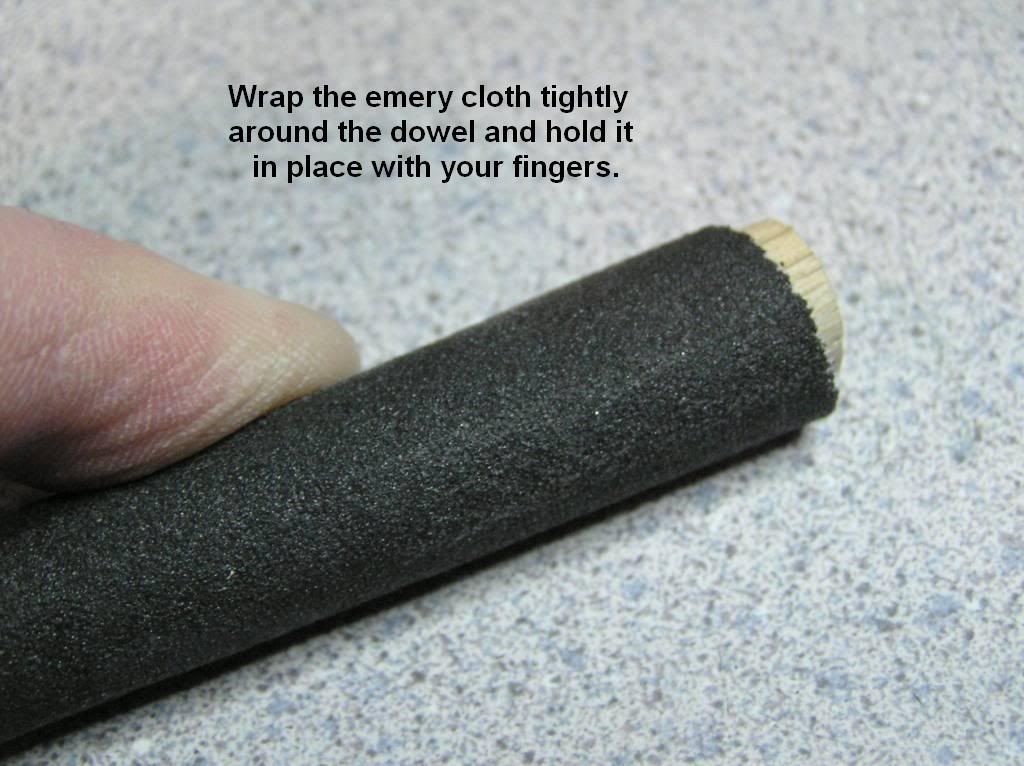
Full size image: »http://img.photobucket.com/albums/v...«
Then, I suggest to cover the edge bevels with magic marker. This will help to ensure that you are sharpening at the correct angle as the marker will be removed where the abrasive hits the bevel.
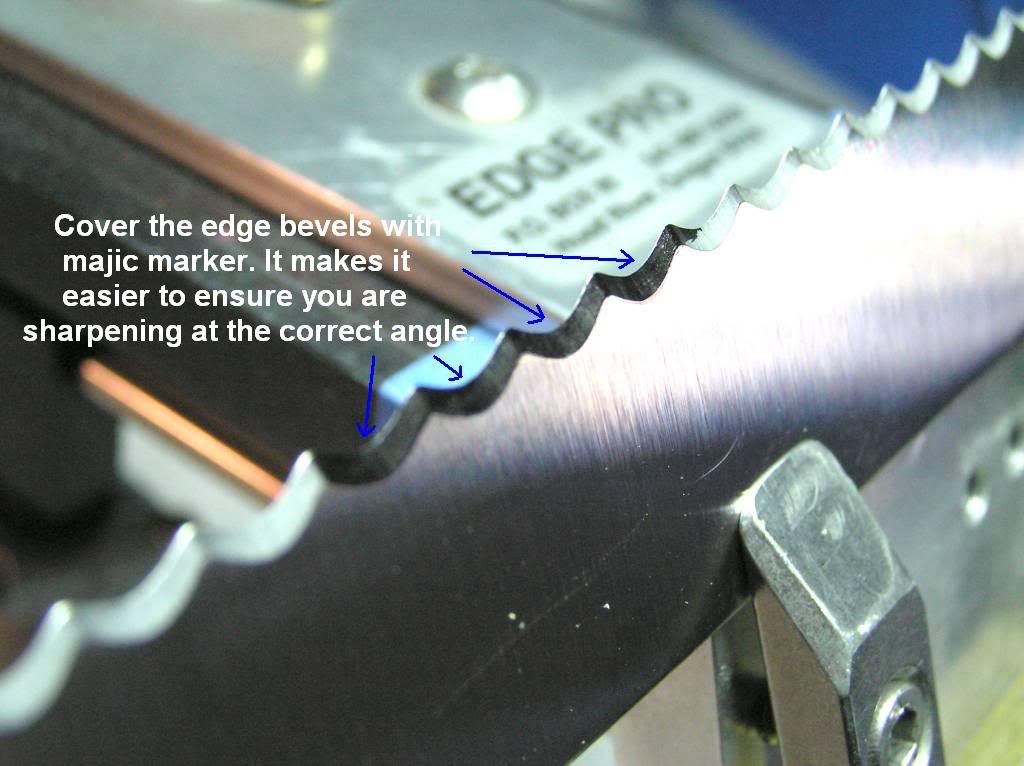
Full size image: »http://img.photobucket.com/albums/v...«
Make sure that you sharpen at the same bevel angle that was set by the factory. Why? Because it looks better.

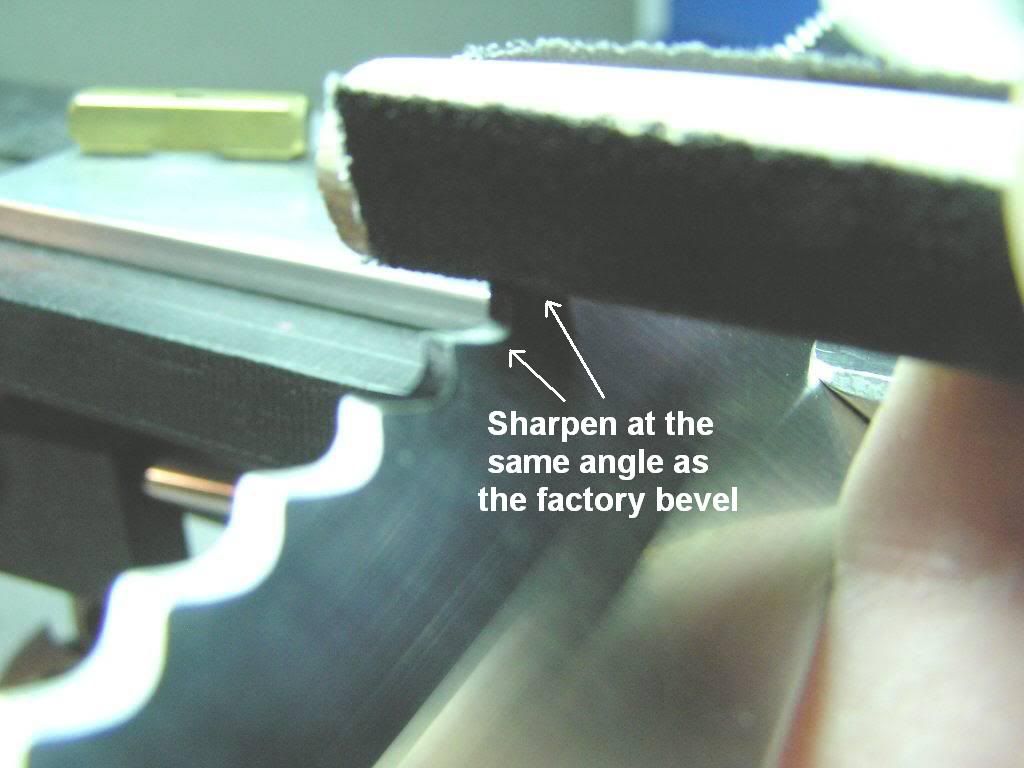
Full size image: »http://img.photobucket.com/albums/v...«
Sharpen only enough to make 1/2 of the rounded tip pointed on both sides of the gulley. The point will become full when you sharpen the next gulley over. You want to only do just enough to raise the tiniest burr (on the reverse) and to just start to remove the rounded tips on both sides of the gulley you are sharpening.
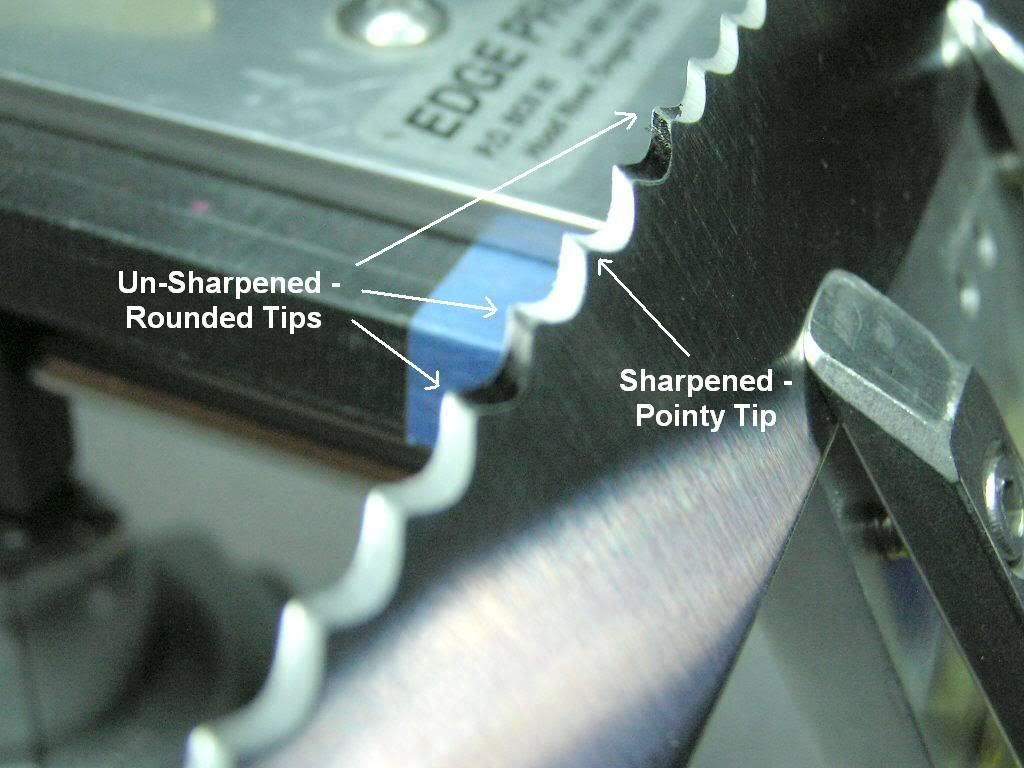
Full size image: »http://img.photobucket.com/albums/v...«
Full size image: »http://img.photobucket.com/albums/v...«
When sharpening try to hold the angle of the dowel constant (the same) for each gulley you sharpen as you did for the others. It's not imperitive to do so but the result will be much more appealing to the eye.
The only thing left at this point will be to remove the burr.
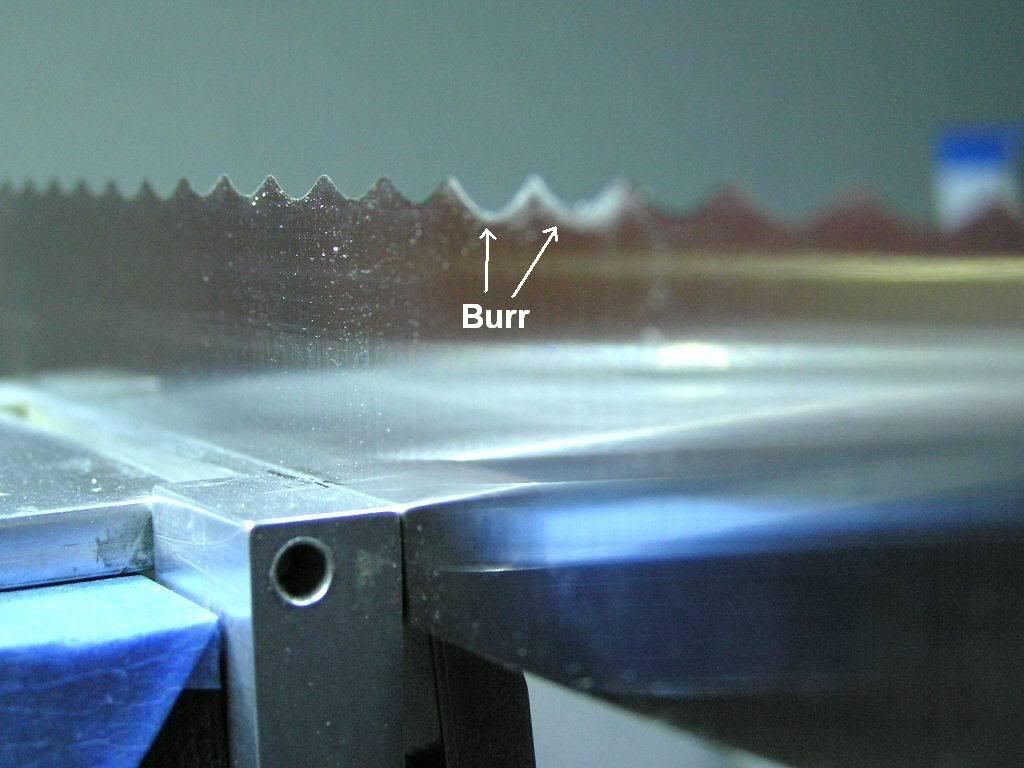
Full size image: »http://img.photobucket.com/albums/v...«
I usually run the knife across a buffing wheel to remove the burr but you can run the knife lightly through a peice of soft wood followed by using a wadded up peice of paper towel to wipe off any residual cling-ons that just won't let go.
So that's it. A grand total of (less than) $10 and maybe 1/2 hr (tops) and your knife is better than new. Now you have no excuses for still having those dull serrated knives lying around do you?
Happy Sharpening folks!!
Does this look familiar?
Full size image: »http://img.photobucket.com/albums/v...«
I've been asked a lot about how to sharpen serrated knives so I thought I'd throw together a little information on how someone can easily do so at home with items easily found at their local Home Depot.
The tools of choice are an assortment of wooden dowels and cloth backed sandpaper. Simple enough? I hope so.
Full size image: »http://img.photobucket.com/albums/v...«
I prefer cloth backed sandpaper because it's less likely to tear if caught slightly off angle. I like to use "medium" grit as it cuts fast, but if you want a finer finish, you could use "fine" grit instead.
I purchased 36" lengths of all the dowels shown as well as a package of medium grit emery cloth for less than $10 at Home Depot. I think it was actually less than eight but I lost the reciept so there.
The round dowels are used for round serrations and the square dowels are used for v-shaped serrations.
You will want to start off by mounting the knife in a vise. If you don't have a vise don't worry as you can do this while holding the knife in one hand. It's just easier to do with the use of a vise.
Then select the appropriate sized wooden dowel to use. The right size dowel will fit into the gulley of the serration, will touch the edge bevel, and will not rock or wobble side to side. The 1/2" dowel is the one that is most commonly used for sharpening the serrations on Wusthoff and similar level knives.
Full size image: »http://img.photobucket.com/albums/v...«
Wrap a strip of emery cloth around the pre-selected dowel so that it only wraps around 3/4 of the dowel's circumference.
Full size image: »http://img.photobucket.com/albums/v...«
The sandpaper will be held in place by finger pressure. It should look like this...
Full size image: »http://img.photobucket.com/albums/v...«
Then, I suggest to cover the edge bevels with magic marker. This will help to ensure that you are sharpening at the correct angle as the marker will be removed where the abrasive hits the bevel.
Full size image: »http://img.photobucket.com/albums/v...«
Make sure that you sharpen at the same bevel angle that was set by the factory. Why? Because it looks better.
Full size image: »http://img.photobucket.com/albums/v...«
Sharpen only enough to make 1/2 of the rounded tip pointed on both sides of the gulley. The point will become full when you sharpen the next gulley over. You want to only do just enough to raise the tiniest burr (on the reverse) and to just start to remove the rounded tips on both sides of the gulley you are sharpening.
Full size image: »http://img.photobucket.com/albums/v...«
Full size image: »http://img.photobucket.com/albums/v...«
When sharpening try to hold the angle of the dowel constant (the same) for each gulley you sharpen as you did for the others. It's not imperitive to do so but the result will be much more appealing to the eye.
The only thing left at this point will be to remove the burr.
Full size image: »http://img.photobucket.com/albums/v...«
I usually run the knife across a buffing wheel to remove the burr but you can run the knife lightly through a peice of soft wood followed by using a wadded up peice of paper towel to wipe off any residual cling-ons that just won't let go.
So that's it. A grand total of (less than) $10 and maybe 1/2 hr (tops) and your knife is better than new. Now you have no excuses for still having those dull serrated knives lying around do you?
Happy Sharpening folks!!
 :razz: